Know Some Unknown Benefits Of Microsoft PowerPoint
Microsoft PowerPoint is the most popular app for creating presentations. PowerPoint has great features for creating slides for presentations. Some of these features are known and popular but many remain hidden from our eyes. Microsoft is constantly adding new features to PowerPoint. So if you know about new and hidden features, you can create slides more easily. This saves time as well as reduces the hassle of making presentations.
Today in this post we will talk about some unknown and lesser known features of PowerPoint which you might have never used. These features can play an important role in increasing the efficiency in creating slides. So know about these unknown features.
Remove image background
Image background removal is an advanced photo editing feature. Many of us do this with Photoshop or a good image editing tool. But many of us don't know that there is a powerful image editor tool inside PowerPoint. Within PowerPoint, you can easily crop, blur, rotate or remove the background.
To use this feature you must first add an image to the slide and select it. Then find the Adjust section from the Picture Format tab above and click on the Remove Background option on the left side.
You will then see that the background is selected alone without the main object of the image. You can also mark other sections as you like to delete or keep. For that you have to select any option in the above ribbon.
Once done you need to save it by clicking on Keep Changes option. You can discard these changes using the Discard All Changes option.
Color matching with the eyedropper tool
In presentation, the main goal is to make all the slides look beautiful and attractive. And that's why all the slides are nicely arranged in matching colors. And the eyedropper tool is a very handy thing to match this color. You can use this tool to decorate the entire slide with the color of your choice from any image or place.
First you select any object in the slide whose color you want to change. You can select text, shapes, or anything on the slide.
Now click on the Home tab from the upper ribbon and click on the font color from the Font section. From here click on Eyedropper option.
Now your cursor will change to eyedropper. Now you have to select the color of your choice with the cursor. It's not just PowerPoint that you have to select from. Rather, you can select the color of your choice from any part of the PC. The color of the object you are changing will change immediately upon selection.
Resizing multiple images or objects simultaneously
When you add different images or objects to a slide, it needs to be kept in a certain size. Many of us resize each object separately to fix this size. But if you want, you can resize many objects to the same size. This will save time and make slides much easier.
First you need to select the objects by holding down the Ctrl key on Windows or the Command key on Mac.
Then you need to select the ribbon tab according to the type of object. For example, if all are images, you need to go to the Picture Format tab. From the Size section on the right side, you can now select how long and wide you want. Then you can save it by pressing enter.
Trim video
Adding videos to slideshows is often required. Sometimes it is necessary to cut different parts of the video. But you don't need a separate video editor to do this. The task can easily be done within PowerPoint.
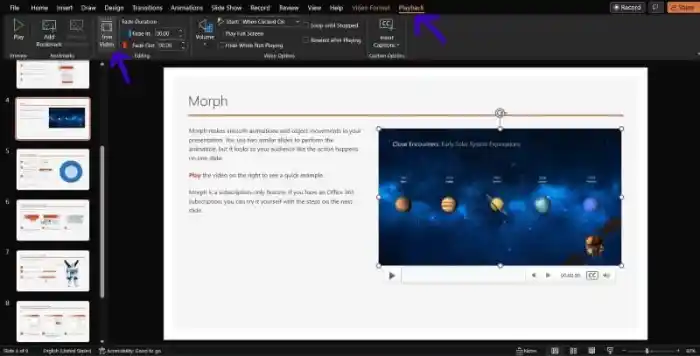
First select the video you want to trim in PowerPoint. Then go to the Playback tab at the top. From here find and click on Trim Video option in Editing section.
Now in a new box the clip will come for video trim. Here you can skip different parts of the video using the slider. After watching the entire video by pressing play option you can save it by pressing OK.
Subtitles for live translation
This feature is very useful when you present your slides to different speakers. Also, if some of your audience have hearing problems, this feature may be useful. Using it you can easily show subtitles throughout your presentation. As a result, understanding the presentation will become much easier.
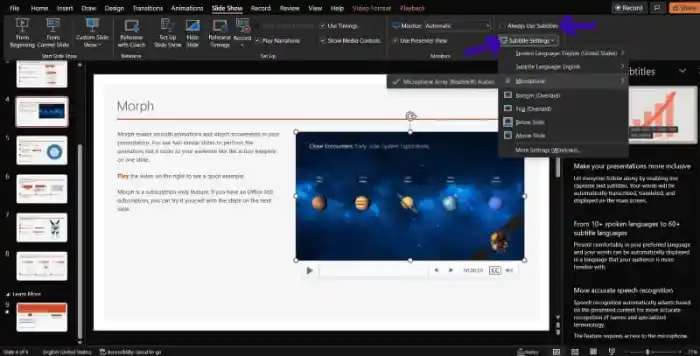
For this you need to open the drop down menu by clicking on Subtitle Settings from the Slide Show tab. From here you can select your language and also select the subtitle language. In addition, you can fix the position of the microphone and subtitles.
The Always Use Subtitles option above should be ticked to show subtitles in the presentation. In addition, during the presentation, you can turn on the subtitles at any time by right-clicking on the slide from the Start Subtitles shortcut menu.
Summary zoom slide
This is a great feature to quickly move from one slide to another. With this feature you can keep a linked thumbnail of all your slides in one slide and move from this slide to any other slide easily.
To use this feature, first click Zoom > Summary Zoom from the Insert tab.
When the summary zoom box comes up, select the slide you want to use and click Insert.
The Summary Zoom slide will be added as the first slide. During the presentation you can click on any of the slide thumbnails to go directly to that slide.
Create custom shows
Many of us do not know that within the main slideshow, you can create separate small slideshows in PowerPoint. This feature is called Custom Show. This feature allows you to create separate slideshows for different audiences within the same slideshow.
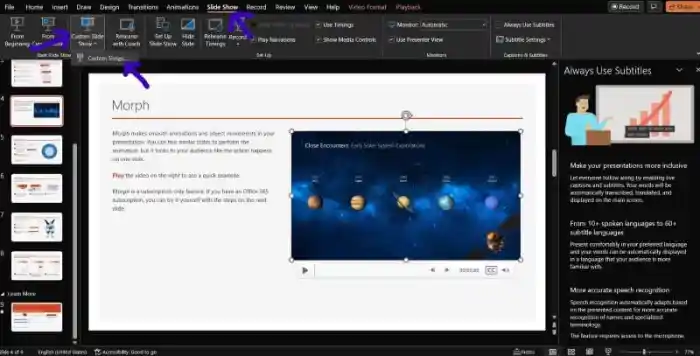
For this you need to click on Custom Slide Show option from Slide Show tab. Select Custom Shows from the drop down menu.
Then click on the New option and give a name to the show and select the slide. Add it to the show using the Add option.


